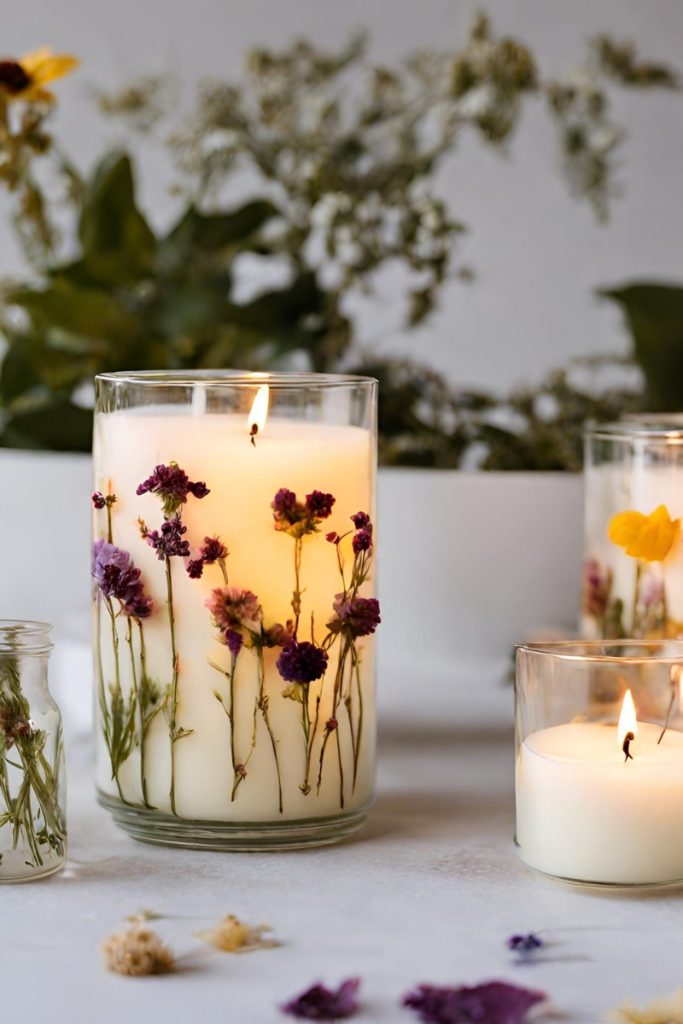
If you’re looking for a fun and creative way to add some natural beauty to your home, DIY pressed flower candles are a great option. These candles are not only visually stunning, but they also emit a lovely floral scent when lit. Making your own pressed flower candles is a simple and affordable project that can be done with just a few basic supplies.
To make DIY pressed flower candles, you’ll need to start by pressing some fresh flowers. This can be done using a flower press or by placing the flowers between two sheets of wax paper and placing a heavy book on top. Once your flowers are pressed and dried, you can start decorating your candles. Simply melt some candle wax in a double boiler, dip your flowers in the wax, and press them onto the surface of your candle. You can arrange the flowers in any pattern or design you like, creating a unique and personalized candle that’s perfect for your home or as a gift for someone special.
Whether you’re a seasoned crafter or just looking for a fun weekend project, DIY pressed flower candles are a great option. With just a few simple steps, you can create a beautiful and fragrant candle that’s sure to impress. So why not give it a try and add some natural beauty to your home?
Essentials of DIY Pressed Flower Candles
Making your own pressed flower candles is a fun and creative way to decorate your home or give as a gift. Before you get started, it’s important to have all the necessary materials and knowledge to ensure your candles turn out beautifully. In this section, we’ll go over the essentials of DIY pressed flower candles, including choosing the right materials, types of flowers to press, and preparing your workspace.
Choosing the Right Materials
To make pressed flower candles, you will need the following materials:
- Pillar candles
- Tea lights
- Dried flowers
- Flower press or heavy book
- Paintbrush
- Wax paper
When choosing your candles, it’s important to select high-quality, unscented ones. Scented candles can interfere with the natural fragrance of the flowers and may cause allergies. For the flowers, choose ones that are flat and thin, such as pansies, daisies, or violets. You can use a flower press to dry them, or place them between the pages of a heavy book for a few weeks.
Types of Flowers to Press
Not all flowers are suitable for pressing. Some flowers have too much moisture and will not dry properly, while others are too thick and will not flatten well. Here are some of the best flowers for pressing:
- Pansies
- Daisies
- Violets
- Buttercups
- Ferns
- Forget-me-nots
Before pressing your flowers, make sure they are clean and dry. Remove any excess leaves or stems and gently press them between two sheets of wax paper.
Preparing Your Workspace
Creating pressed flower candles can be messy, so it’s important to prepare your workspace beforehand. Lay down some newspaper or a plastic tablecloth to protect your surface from any wax spills or flower debris. Make sure you have all your materials within reach and have a clean, flat surface to work on.
Now that you know the essentials of DIY pressed flower candles, you’re ready to get started! With a little creativity and patience, you can create beautiful and unique candles that will brighten up any room in your home.
Creating Your Pressed Flower Candles
Making your own pressed flower candles is a fun and creative way to add a personal touch to your home decor or give as a thoughtful gift. Here are the steps to create your own beautiful pressed flower candles.
Pressing the Flowers
The first step in making your pressed flower candles is to press your flowers. There are several methods you can use to press your flowers, including using a book or a flower press. You can also purchase pre-pressed flowers from craft stores or online.
To press your own flowers, start by selecting the flowers you want to use in your candle. Choose flowers that are flat and thin, such as pansies, daisies, or violets. Place your flowers between two sheets of absorbent paper, such as blotting paper or tissue paper. Then, place the paper and flowers between the pages of a heavy book. Stack more books on top of the book with the flowers, and leave them for a few weeks until they are completely dry and flat.
Arranging Flowers on the Candle
Once your flowers are pressed and dried, it’s time to arrange them on your candle. Choose a plain white candle, either a pillar or a tea light, that will showcase your flowers. You can also use a colored candle if you prefer.
To arrange your flowers, start by melting a small amount of wax from a tea light. Use a brush to apply the melted wax to the back of your flower, then place the flower onto the candle. Hold the flower in place for a few seconds until the wax cools and hardens. Repeat this process with each flower until you have created your desired design.
Wax Melting and Pouring Techniques
Before you start arranging your flowers on the candle, you need to melt your wax. You can use either paraffin wax or soy wax, which can be purchased at most craft stores or online. Melt the wax in a double boiler or a heat-resistant container placed in a pot of boiling water.
Once the wax is melted, you can add fragrance oils or essential oils to give your candle a lovely scent. Stir in the oils thoroughly, then carefully pour the wax into your candle jar or mold. Place your wick in the center of the candle, and hold it in place until the wax cools and hardens.
With these simple steps, you can create your own beautiful pressed flower candles that will add a touch of nature and beauty to your home.
Finishing Touches and Preservation
After you have arranged the pressed flowers on your candle, it’s time to add the finishing touches to your DIY pressed flower candles. Here are some tips to help you seal the flowers and preserve your candles for long-lasting enjoyment.
Sealing the Flowers
To seal the flowers onto your candle, you can use melted wax. According to Little Pine Learners, you can light a tea candle and wait until it has melted a bit. Then, gently dip a paintbrush into the melted wax, and use it to glue the flowers onto the candle. The melted wax will act as a sealant and help the flowers stay in place.
Candle Curing Process
After you have sealed the flowers onto your candle, it’s important to let the candle cure for a few days before burning it. During the curing process, the wax will harden and the scent will develop fully. According to Domestically Blissful, you should let your candle cure for at least 24 hours before burning it.
To preserve your DIY pressed flower candles, it’s important to store them properly. Keep them away from direct sunlight and heat, as this can cause the flowers to fade and the wax to melt. You can also wrap them in tissue paper or bubble wrap to protect them from dust and scratches.
By following these simple tips, you can create beautiful and long-lasting DIY pressed flower candles that you can enjoy for years to come.
Troubleshooting Common Issues
If you encounter problems while making DIY pressed flower candles, don’t worry! Here are some common issues you might face and how to troubleshoot them.
Flower Discoloration
If you notice that your flowers are losing their color and turning brown, it could be due to two reasons: the flowers are not completely dry, or the wax is too hot. To prevent this, make sure your flowers are completely dry before using them. You can do this by pressing them between two pieces of paper and placing a heavy object on top for a few days. Also, make sure the wax is not too hot. If the wax is too hot, it can cause the flowers to discolor.
Wax Imperfections
If you notice that your wax has imperfections such as air bubbles or uneven surfaces, it could be due to the type of wax you are using. Some waxes are more prone to imperfections than others. To prevent this, make sure you are using a high-quality wax specifically designed for candle-making. Also, make sure you are pouring the wax at the correct temperature. If the wax is too hot or too cold, it can cause imperfections.
Candle Burning Problems
If you notice that your candle is not burning properly, it could be due to the type of wick you are using. Make sure you are using a wick that is appropriate for the size of your candle. If the wick is too small, it won’t burn properly, and if it’s too large, it will burn too quickly. Also, make sure your candle is placed on a level surface and away from any drafts. If the candle is not level or in a drafty area, it can affect the way it burns.